We recommend testing the tracking process from start to finish when you place an affiliate postback. In other words starting with your affiliates tracking link and ending with your affiliate conversion link. Once the testing is completed, you can be sure that everything is working perfectly fine and tracking is functional when the offer goes live on your affiliates end.
Testing Setup
First you need to go to Affiliates > Postback Pixels.
Then you can click on the “Add callback” button as mentioned in the screenshot and fill the required fields and most importantly add the postback URL/pixel provided by the affiliate.

Then a new window will pop up to add a new callback in which you can add the postback URL/ pixel provided by the affiliate as shown below,

And once you have added callback with the pixel and provided you have the test link affiliate shared with you, you can click on Test in its respective column:

On the next page you will see a process that is needed to complete the test. First option is to select the offer that is related to the test link provided by the affiliate and the second option would be already done, which is select the affiliate that you want to test. The next step is to place the affiliate tracking link from the affiliate’s system into the field. This tracking link should redirect to your networks tracking link for the affiliate. When the tracking link has been pasted into the field for Step Two, click Start Test:

Once you click on the “Start Test” button, the “Postback Test Wizard” will pop up and you can follow the steps accordingly, refer below

On Step 1, you will open the tracking link in a new tab in your browser. This begins a test tracking session for both your and the affiliate’s tracking systems and redirect to the offer landing page. Once the landing page fully loads, you can close your browser tab.
On Step 2, you can click on “Confirm” to confirm that the tracking page landing is completed once it does.
On Step 3, you can see a test URL that will fire the conversion, and you can test fire the conversion by clicking “Fire Postback”. This takes you to a new testing page URL that is similar to an offer conversion tracking pixel URL, but without any HTML code:
https://demo.go2oh.net/pb_x?offer_id=91&test=true
The appended test=true parameter tells the ad server that the conversion is a test (and to display the conversion results).
Test Results
When you click “Fire Postback” in Step 3, this will trigger the conversion with the following URL:
https://demo.go2oh.net/pb_x?offer_id=91&test=true
And this link (you can even click on open link) will show a response similar to this:
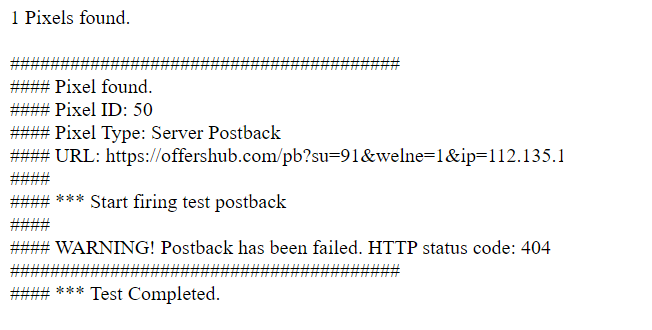
From the above report you can see if the test was successful or not by doing below,
- Checking if the postback firing was successful or failed. And in the example provided above, it’s an instance where it failed with a warning message and a 404 status code.
And if the postback firing was successful, you’ll see a success message.

- Checking if the macros are replaced correctly and has been passed to the affiliate accordingly from your pixel URL, and if it that’s the case you have successfully tested your postback pixel/ url and is working perfectly fine.

Conversion Report
After the test is done and all the responses look fine, the affiliate will now have to confirm if the conversion was recorded on their end. If so, and all the values are passed correctly, then the affiliate’s pixel/postback is ready to go live on their end. In the meantime, you can check that the tested conversion appears in your own conversion report with the “Test Conversion” status message:
