Branding your dashboard
By default we deliver your dashboard without any branding. So let’s go ahead and add your network/company name, logos and other branding details on your dashboard so everyone can identify that it yours. Since, OffersHub is sold as a white label publisher/affiliate tracking solution. We provide you with the adaptability to alter/modify the interface in ways that mirror the style of your brand/network. You can even include your own logo, change colours and even use your own domain + SSL certificates for the application and tracking servers through this option.
Login to your dashboard and visit: Settings > System Preferences > Branding
There you will see a bunch of options to setup your network details and upload logos and icons. Fill all the details in correct manner and save.
Setup Initial configurations
Your default timezone and currency will be used to generate reports. It is required to setup default currency and timezone for your network before you get started.
Setup System Timezone
You can change the system timezone by going to Settings > System Preferences > Platform Settings > Default Timezone.
This is a very useful setting when it comes to looking at conversion and stat reports to check when clicks and conversions came in. The Data Audit Logs also use these values to determine when a setting is changed.
Setup Default Currency
You can change the default currency by going to Settings > System Preferences > Currencies and Rates > You can click on “Make Default” button to make the relevant currency the default currency. Also OffersHub even supports adding currency types as well as cryptocurrencies.
Adding Team Members
You can add team members if needed, employees
To manage your team members/ employees you can log in to your network, where you can view and manage all network employee/ team members accounts that have been created.
Settings > Manage Employees (Here, you can view and manage all network employee accounts that have been created.)
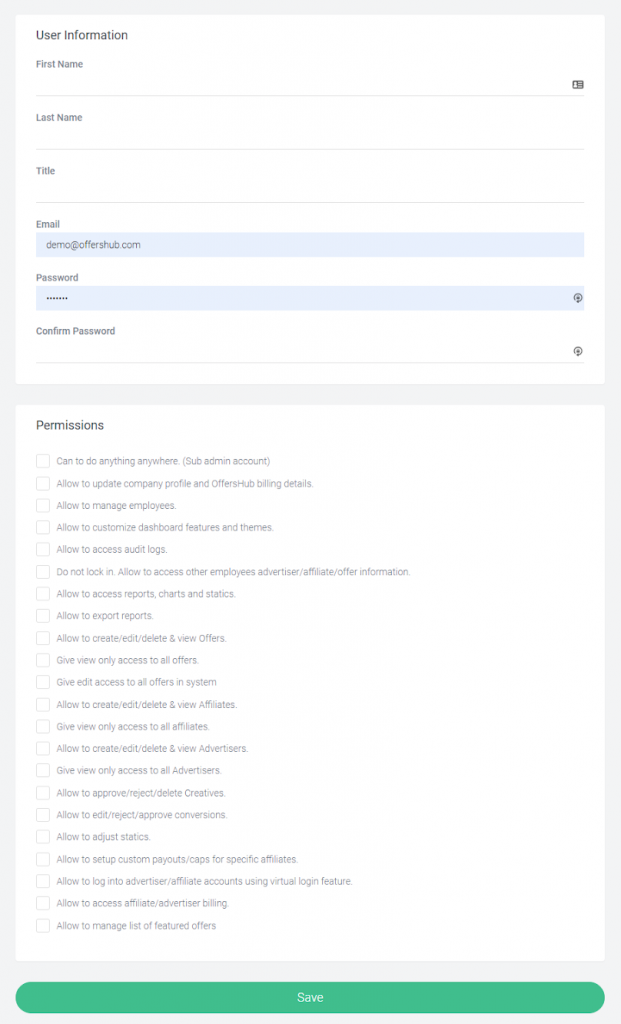
Once you are in the “Manage Employees” page you can click on “Create Employee” to create a new employee/ team member. You can fill in their user information as well as provide them with permissions as listed below in the screenshot.
Learn about tasks
This will be displayed on the top right corner, right next to notifications icon.
Here you will be able to see all the pending tasks at a glance, just one click away including the number of tasks right next to the name of the task.
Task Notifications
- Pending Affiliates
- Pending Advertisers
- Pending Affiliate Pixels
- Offer Applications
- Postback Applications
- Pending Creatives
- Learn about notifications
When dealing with an enormous group of affiliates, advertisers and employees, it can frequently be difficult to monitor all the activities in your platform. To help with the occasionally overpowering amount of data in your platform, we provide you with a notification system that automatically informs/ notifies you, your publishers, advertisers and other employees of relevant activities when it happens.
Some Notification Types
- New Publisher/ Advertiser Signup Alerts
- Account Change Notification
- Offer Application Awaiting Approval
- Offer Status Change
- Offer Expiration Approaching
- Publisher/ Offer Conversion Caps
- Publisher-Only Notifications
- Invoice Paid
- Approved for offer
- The Payout of offer name has changed
- Offer paused or schedule a change
Moving forward,
OffersHub is sold as a white label affiliate network management software. With us you have the flexibility to modify the interface as your wish, in ways that the style of your brand is reflected. You can add your logo, modify/change the colours and even use your own domain name for the software and the tracking servers.
- Add your own domains
You can Add/Change your own domains for dashboard and tracking with OffersHub by going to,
Settings > System Preferences > Domains
Dashboard Domain
This allows you to host your publisher/affiliate network on a custom domain as you please. Example : affiliates.sample.com
Before you start setup, you need to create a CNAME record from the DNS manager of your domain host. Your CNAME record value is “YOUR-NETWORK-ID.offershub.com”. Replace “YOUR-NETWORK-ID” with your OffersHub account id.
Tracking Domain
This allows you to host your offer tracking links on a custom domain as you please.
Example : tracking.sample.com
Before you start setup, you need to create a CNAME record from the DNS manager of your domain host. Your CNAME record value is “YOUR-NETWORK-ID.offershub.com”. Replace “YOUR-NETWORK-ID” with your OffersHub account id.
- Add email server configs (optional)
Want to send all the notifications and emails from your own email server? No problem, we provide option to setup then. Go to Settings -> Preferences -> Email Settings. There you can configure your email server with OffersHub and test connection.

To use Gmail as your SMTP server, first, you need to turn on the “Access for less secure apps” setting within your Gmail account. This allows external systems (such as OffersHub) to interface with your account. To learn more and change this setting, go to google.com/settings/security/lesssecureapps.
If you see a notice that 2-Step Verification turned on and can’t use this setting, you need to generate an app-specific password to integrate with OffersHub. Do so by going to security.google.com/settings/security/apppasswords.
Once you do whichever step is relevant to your Gmail account, fill in the Email Domain fields with:
- SMTP Server: Use Custom
- SMTP Host: smtp.gmail.com
- SMTP Port: 465
- Encryption Protocol: SSL
- SMTP Username: your full email address, including “@gmail.com” or “@yourdomain.com”
- SMTP Password: your Gmail password, or the app-specific password if you generated one
Create Your First Offer and Start Tracking
- Create advertiser account
To create an advertiser in your system, go to Advertisers > Create Advertiser. On the page that appears,
You can input all the necessary information to create an account for an advertiser.
Now you can fill the security settings where you can enable the postback security key and whitelist the IPs if needed.
As for the final step, assign an account manager for the advertiser and set the account status to “Active”
- Create offer
With OffersHub, you have multiple ways to create an offer. In this section, we will show you how to create an offer using your dashboard console. Behalf of that, you can also create offers using your Partner API, Advertiser API, import from a 3rd party network using Offer Sync API or import offers from a file.
Prerequisites
- An advertiser account in your system for your offer’s advertiser. If you don’t have one yet, it’s time for now to create an advertiser account.
- The offer landing URL provided by your advertiser
Once you’ve fulfilled all the prerequisites, navigate to “ Menu ‣ Offers ‣ Create Offer “
In this first section you can fill out the basic information of your offer and for more information you can click here to go to the offer/ campaign help section.
- Create affiliate account or invite them to join your network.
Admins and network employees can manually create affiliate accounts in your platform. In addition to being manually created, affiliates can also apply/ signup to your network through the signup form which is a hosted sign-up page provided by OffersHub. Potential affiliates can access your sign-up form at: http://accountID.offershub.com/register/affiliate
Click here to learn more about how to create affiliate accounts step by step.
- Sending your first click
You can find the tracking URLS in the Tracking Codes tab once you select your offer in Manage Offers tab.
The offer tracking url will be generated in Click Tracking url. You can select the Affiliate from the drop down menu to whom this offer is going to be assigned to and the tracking link will be generated. You can add the additional parameters requested by your affiliate.
- Recieving your first conversion
You can get here by ,
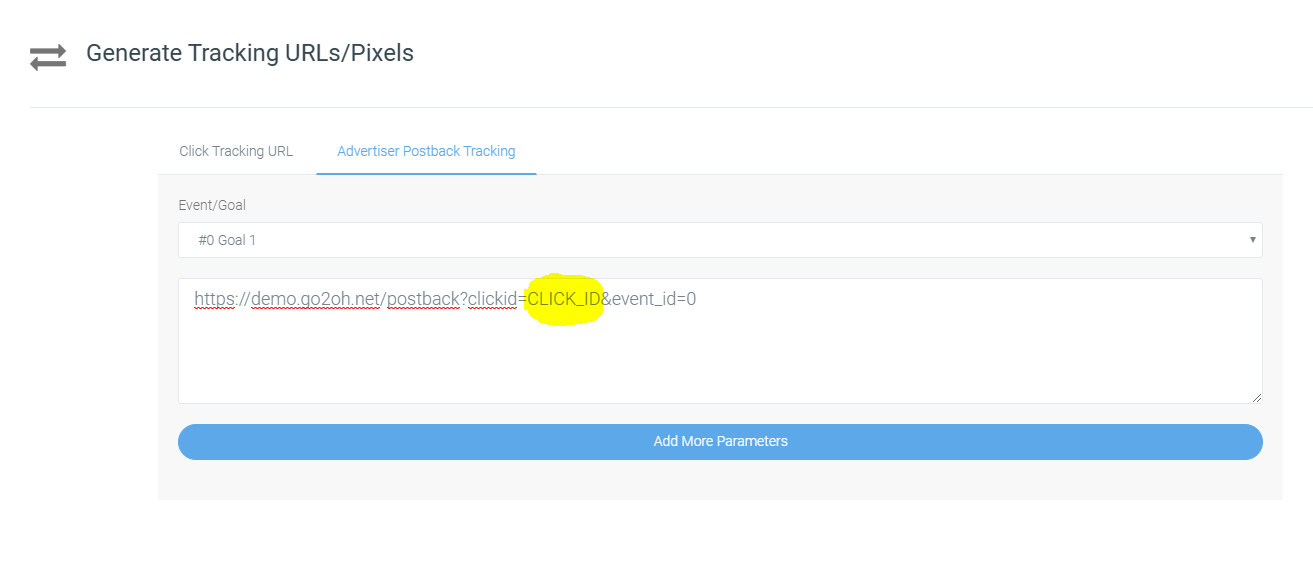
- Go to the offer you want to generate the postback tracking urls for
- Click on “Tracking Codes”
- Open “Advertiser Postback Tracking” tab
You can select a goal for the certrain postback url if there are events. If not you can copy the given link but make sure to replace the Click ID with your advertisers parameter from their own platform.
Example: Original URL –
https://demo.go2oh.net/postback?clickid=CLICK_ID&event_id=0
And say your advertiser is using the parameter “aff_test” to pass the click ID with you. Then the postback URL should look like this